Friday, October 14, 2011

How to Potty Train Without Pull-Ups

I have nothing against Pull-Ups or anyone who uses them.  I use the brand name here as a general term for all training diapers because it is the one with which we are all most familiar.

When it came time for me to potty train Superman he was 3 years old and not showing the slightest interest in the subject.  I had been waiting for him to show interest - like the books tell you to do - but he was as content as a pig in mud to keep pooping in a diaper.  However, this Cheap Mama was sick and tired of changing those diapers and so I determined that the month he turned 3 years old we would begin potty training.
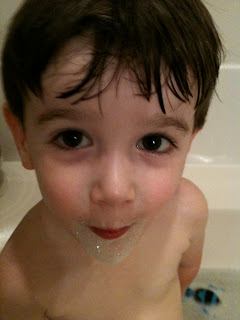
See, completely adorable with his bubble beard but absolutely no interest in the potty.


I also knew that after changing about a zillion diapers over three years I didn't want to spend the next year changing poopy Pull-Ups.  I decided to go old school and potty train cold turkey.  No diapers.  No Pull-Ups.  Just a boy and a toilet.  I wanted to do it to save both money and time in the potty training process.

I began by scouring the internet to see what tips I could find on the subject and came across a website that I used with complete success.  It's called the 3 Day Potty Training method and it's the brainchild of a woman named Lora Jensen.  I have absolutely no affiliations with Ms. Jensen other than the fact that I used her method and would highly recommend it to anyone beginning to potty train.  It is very positive for the children, encouraging for the mothers and offers online help.  I realize that there are probably other methods out there that work well also.  The bottom line (get it - bottom line?) is you don't have to spend a year using Pull-Ups while trying to potty train your child.

Now as a disclaimer, we did have the normal setbacks associated with potty training such as little accidents here and there and an occasional poopy pair of underwear, but I can tell you that we never once had to use a training diaper.  I may have had to replace some of those poopy pairs of underwear but the savings of never having to buy a single pack of Pull-Ups greatly outweighed any extra money I had to spend on underwear.  One word on buying underwear - don't get sucked into buying your kids the expensive character underwear unless you're using them as a prize in the potty training process!

Hopefully this will help you become a potty training Cheap Mama and save on your bottom line too.  Sorry, had to get that pun in there just one more time!

Good luck Cheap Mamas!

Thursday, October 13, 2011

Hot/Cold Faucet Trick for Kids

When my son got tall enough to reach the faucet in the sink I was thrilled because this meant he was gaining some independence and could wash his own hands without me hoisting him up to the sink.  Woohoo!  It also meant that I was worried about him scalding himself with the hot water.  Because he couldn't read yet, I knew it would have to be a simple way for him to remember which side was hot and which was cold.

I decided to use rubber bands on the faucet handles; red for hot and blue for cold.  After that he never had a problem remembering which one to use!


Hopefully that will be a little trick you can use for your own kiddos!  Thanks for reading, Cheap Mamas!

Wednesday, October 12, 2011

Great OPI Nail Polish Knock-Off

Warning:  I am not a hand model.  Or a manicurist.  You'll see why below!

As fall rolls around I begin to pull out some of my favorite dark nail polish colors.  One of those favorites is the OPI color You Don't Know Jacques.  It is a wonderful matte greige and I wear it practically throughout both the fall and winter seasons.  I didn't know what 'greige' was until I read a fashion magazine and discovered that this was the new moniker given to this gray/beige color.  I love it because it goes with almost any dark color throughout the season but it doesn't make me look like I'm trying to look like a teenager.

OPI nail polishes have been one of those little happy items that I would occasionally treat myself with as a little reward for all that I do to scrimp and save.  However, even just occasionally purchasing these items was still difficult.  It just seemed a little steep to pay $8-$9 for a bottle of nail polish.

As luck would have it, though, this week I stumbled upon an exact replica of You Don't Know Jacques completely by accident with a price tag of only $2!  I was passing the time in Walgreen's while my son was in his karate class when I found the color Nirvana by Sinful Colors Professional.  I brought it home to compare and here are the results.  I painted one hand with each and you can see for yourself below - you can't tell the difference!

Now, I love my OPI colors as much as the next girl but if you're in need of a great 'greige' for fall and winter I think you'll like Nirvana.

In the bottle...


On the hand...


I told you I'm not a hand model.  Where's George Costanza when you need him?

Happy nail painting, Cheap Mamas!

Monday, October 10, 2011

Bulletin Board Bow Organizer

Having a little girl is like having an accessories explosion inside your house.  My first child was a boy and to clothe a boy you need 4 things: shirt, pants, shoes, socks.  Sometimes you don't even need the socks.

When clothing a girl the number of necessary items grows exponentially.  One of those necessary items is, of course, the BOW.  What little girl would be complete without donning a bow approximately the same size as her head?

As Sidekick grew, so did our bow collection and I knew I needed some way to keep them organized.  I had seen bow organizers in our local boutique stores but the Cheap Mama in me just couldn't quite bring myself to fork over the money for one of them.  The one day: LIGHTBULB!  I decided to use a criss-cross ribbon bulletin board that I already had as her bow organizer.

This is all about using what you have so I would never say you need to run out and buy one but if you have one lying around the house, use it!  Ours is hung inside her closet so if the one you have doesn't match the room's decor, it won't matter because no one will see it but you!


Have a blessed week Cheap Mamas!

Tuesday, September 20, 2011

Decorating With Odd Numbers

In college I loved to come home from class and watch Christopher Lowell's home decorating TV show.  I should have known I needed to change my major when all I wanted to do was watch decorating shows and read home interior magazines instead of wasting away in Organic Chemistry lab.  Oh well, I probably wouldn't have made a very good pediatrician anyway what with my internet addiction and homeschooling ways. While watching Christopher's show I learned many tricks from him.  Namely that you can make just about anything with guns of the both the staple and hot glue variety, a tip that I use to this very day.

His show was almost like a how to decorate show or Home Decorating for Dummies and I loved it.  One of the tricks of the trade that he shared was the power of decorating in odd numbers.  Be it a single picture or a grouping of 3, 5, or 9, using odd numbers often works well when creating vignettes for a mantel, side table or table scape.

To show the power of decorating in odd numbers I have pulled some photos from Pinterest to show how it can work in different settings.

However, don't think that even numbers are left out in home decorating!  In my next post I'm going to show how symmetry and even numbers can be used as well.

Here are some of the absolutely lovely photos I pulled from Pinterest.


Three throw pillows on a sofa.


Three candles on a table.


Three pumpkins for fall.


Five stems in a vase.


I love how the 7 candlesticks are broken up into groups of 4 and 3.


Three topiaries on a Christmas mantel.


Three canisters in the kitchen.


A simple but beautiful vignette of three single items.


Three pieces of artwork in a child's room.


And, of course, the power of one beautiful floral arrangement.


I can't wait to share all of the great ideas I found in decorating with even numbers.  It'll be great for all of you quasi-OCD people like me!

Happy decorating Cheap Mamas!

Wednesday, September 7, 2011

Williams Sonoma Inspired Pumpkin Wreath for Cheap

I would love to take credit for this idea all on my own.  I would love to tell you that I was scouring the web trying to find great fall inspiration to do on a dime.  I would love for you to think all of that and more.

But it just wouldn't be true.

This idea was sent to me from my friend Magnolia via a Facebook message.  She sent me a picture of this pumpkin wreath that she found on the Williams Sonoma website that she was planning to redo for cheap.


This wreath was listed for $99.95 which means that would have cost me one whole benjamin plus shipping so I decided that I, too, would try my hand at reinterpreting this pumpkin wreath for cheap.

One of my least favorite things is trying to glue moss to anything so I decided to use a grapevine wreath instead of a moss covered one for my wreath.  Using this method meant I only needed 3 items to make this wreath: grapevine wreath, pumpkins and brown ribbon.

The WS wreath is listed at 16 inches.  I used a 24 inch grapevine wreath.

The supplies.


I used 10 pumpkins on a stick to make my wreath.  I spaced them out evenly around the wreath, poked the sticks through the grapevine and wrapped them around the back until they were snug.  There's no perfect way to do this!  Just keeping working with it until the pumpkin feels secure.


I tied a strip of ribbon around the wreath itself and then tied my bow to that string.


Finished product.


Here is my friend Magnolia's finished product on her interpretation of the pumpkin wreath.  Doesn't it look fabulous?!  Magnolia spent just under $30 on her wreath by utilizing sales and coupons.  


I purchased all of my products at Hobby Lobby.  Here is the cost breakdown for this cheap pumpkin wreath.

Grapevine wreath: $5.99
Pumpkins: $2.99 each
Ribbon: Varies.  (Ribbon can be as cheap as you want or as fancy as you want.  I already had some brown ribbon so I honestly don't know how much the few inches I used would have cost.)

Most expensive this wreath could be: $36 plus ribbon
Cheapest price this wreath could be: $18 plus ribbon

That's a savings of $82 at most and $64 at the very least!  I could buy a lot of hoodie sweatshirts for that much money.  A lot.

Happy wreathing Cheap Mamas!


Friday, September 2, 2011

Finding the Courage to Say It Out Loud


Earlier this year the idea of homeschooling my children came barreling toward me straight out of left field.  I had never ever considered educating my children in that way.  As the child of a public school teacher and a product of the public school system from kindergarten to college degree, I had always planned on sending my children to the excellent public schools in my area.

However as we know the best laid plans can be blown to smithereens (yes, it's a word) when God intervenes.  There is no other way to explain the course we are now on than to say that God spoke to me in a big way and for once in my life I followed without questioning. 

Once I made the decision to homeschool I was blessed to find other cool moms in my area who were embarking on the same journey - and there wasn't a denim jumper to be found in the whole group.  We began talking about the how to's of homeschooling: how to choose curriculum, how to organize your day, how to fit in field trips, how to socialize your children so they don't end up nerds. 

 I'm only kidding; that's just a little homeschool humor.

And then we began discussing the inevitable small-talk question every person encounters in suburbia, "So, where do your kids go to school?"  It's an innocent enough question.  It's usually just a conversation starter and I had never given it a second thought.  That is, until we were homeschoolers.  I then discovered that this is the question every homeschool parent dreads in the beginning.  

A friend of mine who would now be considered a veteran homeschooler recounted the story of the time her then 5 year old daughter was at the dentist.  The mom was in the waiting room flipping through a magazine but she could hear the conversation from where she sat.  The dentist asked her daughter what grade she was in.  "Kindergarten!" she exclaimed with the enthusiasm only a kindergartener can muster.  "Where do you go to school?", the dentist asked.  My friend stopped flipping the pages of the magazine and time stood still for one long second.  "I'm homeschooled!" the daughter replied.  And then my friend began searching the waiting room for a hole in which to climb.  

It wasn't the daughter who was hesitant to answer the question, it was the mother.  I have since experienced the same thing with my son.  We have been asked by friends, family and complete strangers in the grocery store about where he will be attending kindergarten this year and Superman answers with the same enthusiasm, "I do homeschool!"  I smile a sheepish grin at the inquirer and give a slight nod to confirm that it is indeed true - we are homeschoolers.  It's not that I'm embarrassed of the fact that we homeschool; indeed the opposite is true.  I am excited that we homeschool!  It's the recipient I am concerned with.  Will they think we're weird?  Will they make a snap judgement of me and my family when they hear we homeschool?  Will they think my choice to homeschool is a condemnation of their decision to send their children to public or private school?  All of these thoughts and a million more are swimming around in my head as I am smiling and nodding.  

I am finding, though, that every time I have to say it out loud I gain a little more confidence.  I stand up a little straighter.  I find my voice a little stronger as I confirm that yes, we homeschool  I have found courage in the form of a brown-haired 5 year old little boy.

And a little child shall lead them.


Related Posts Plugin for WordPress, Blogger...