I heart discount shopping. I mean, really love it. I love places like TJMaxx and Marshall's but with two kids dragging behind me, one asking how much longer and the other trying to grab all of the breakables off the shelf, it's usually not worth it for me to ever spend more than 5 minutes in these places. I have visions in my head of older children who will follow me around silently texting on their phones while giving each other eye-rolls behind my back but that dream is a long way from now.
A friend of mine from Oklahoma recently had her third baby in the great state of Alabama and I decided it was time to go visit Katie Scarlett and her newest little nugget and get in some much needed girlfriend time. When she asked me if I'd like to make the drive to HomeGoods a little over an hour away I just about wet myself with excitement. So we loaded our combined 5 kids into her humongous SUV, threw some Chick fil A at them and blazed a trail for a day of discount shopping.
As soon as the doors opened I could have sworn I heard angels singing. It's funny, because I thought those angels only lived in Hobby Lobby but it turns out they're in HomeGoods too. The aisles looked so...shiny. The wares so...discounted. It didn't matter that I didn't need a thing or that the kids were not in the mood for shopping - we were at HomeGoods!
We each grabbed a cart and wandered off in different directions without saying a word. Good shopping friends are like that. They don't feel the need to shop every aisle together and there's an understanding that each gal will go her own way and you'll eventually meet back up when your cart is too full to hold another thing.
I meandered slowly down each aisle carefully contemplating each shiny new purchase. I tried to think of others and what gifts I might need in the near future instead of only shopping for my own house but, um, well, never mind.
Eventually we found ourselves together in the toy section with 5 kids who were D-O-N-E with shopping for the day. A storm rolled in, the lights went off, our kids were pulling toys off of shelves and playing with them in the middle of the aisle and still we kept on shopping. (FYI, in case you ever need to know you can still see price tags by the glow of emergency flourescent lights.) By the time it was all said and done Katie Scarlett and I were having to tag-team. One of us would finish shopping while the other one sat out in the car with the kids listening to Tangled on the DVD player and throwing Goldfish their way. Then, SWITCH! I entertained myself during my car shift by eating more than a single "portion size" of a box of Ghirardelli chocolates.
Never mind that my kids were almost past the breaking point. Never mind that I bought things for my house that I didn't need.
I got to shop at HomeGoods and eat chocolate.
It was a great day.

Showing posts with label home decorating. Show all posts
Showing posts with label home decorating. Show all posts
Wednesday, January 25, 2012
Thursday, November 3, 2011
Decisions, Decisions
This is what I see when I look into my living room.
And I think I want to change it.
Let me explain.

When we built this house 5 years ago I had been saving pictures from magazines for months and months as inspiration for each room in the house. You know, old school Pinterest. At that time it was all about color, color, color and I was determined not to shy away from color by painting every room in the house off-white. I painstakingly chose coordinating color palettes for each room making sure that each room would flow into the next.
Downstairs I favored warm colors with a definite french influence. However, after 5 years of choosing items to fill my home according to this color palette I now feel like it's too heavy. I feel the need to lighten and brighten. But how to do it on a budget?
Some things will have to remain like furniture and window treatments which leaves me with one choice. Paint. As my old guru Christopher Lowell will tell you, the cheapest way to make the most dramatic difference is through paint. So why am I hesitating? Because it's a big job. A really big job. And it's one that I will undertake all by my little lonesome. You see, when Georgia Boy and I got married he knew how much I liked to paint rooms and he promised to be their for moral support only.
I know that if I end up hating my lighten and brighten project I can always re-paint it but thinking about painting these rooms twice makes me want to lie down on the floor until the feeling passes.
See, the problem is that not only will I have to paint the living room but I'll also need to paint the kitchen.
I thought about staging this picture but then I just decided to keep it real.

I'm also planning on painting my kitchen island and the armoire in the living room. Trying to figure out which paint colors to use and how to make it all work together without changing any furniture or fabrics is enough to make a girl go straight to bed with a diet coke and dark chocolate.
I've got my collection of paint chips ready to go and I'm almost ready to pull the trigger. Almost.
First let me go sit down with a diet coke and think it over again.
Thursday, October 27, 2011
A Little Bench and Chalk Paint
For some time I had been wanting a little bench to go in front of my fireplace. A little seat that beckoned me to come sit and warm myself by the fire. I had seen a few in some of my favorite catalogs but of course, being the Cheap Mama that I am, knew that I would never pay full retail price.
So I just kept my eye out when I would go consignment shopping knowing that one day I would find one that fit my budget.
And one day, I did.

I am only kidding. I'm sure one day my children will look at pictures from their childhood and ask me why I painted everything white and made it look old.
I wanted to make this bench look really worn, not perfect at all. I used Annie Sloan Chalk Paint in Old White and then did a coat of clear wax and dark wax which I rubbed into the wood in a circular motion with an old undershirt. I recovered the seat in some scrap fabric that I had leftover from a previous project.


Every time I do another project with Annie Sloan's products I learn something new. What I learned this time is that working on a piece with round legs can be tricky. Because the legs weren't a flat surface I had to go slowly to make sure that the worn look didn't look too uniform and that it didn't get too heavy in places and not heavy enough in other places. I also learned that to get this look it worked better to apply the dark wax in a side-to-side motion and then rub the wax into the paint in a circular motion instead of in the same direction in which I had applied the wax. If I did that, then I ended up essentially wiping off the wax and erasing the effect I was going for. By waxing in one direction and rubbing in a different direction, I got the old patina look that I wanted.
Did anyone else think of Karate Kid with all that talk about wax on, wax off? No, just me?
Tell me what you think of my little bench project and leave any tips you've learned with Annie Sloan products.
Happy Waxing, Cheap Mamas! (Not brow or bikini waxing. That's another post for another time.)
So I just kept my eye out when I would go consignment shopping knowing that one day I would find one that fit my budget.
And one day, I did.
Hello, the 1980's called and they would like their fabric back.

I am only kidding. I'm sure one day my children will look at pictures from their childhood and ask me why I painted everything white and made it look old.
I wanted to make this bench look really worn, not perfect at all. I used Annie Sloan Chalk Paint in Old White and then did a coat of clear wax and dark wax which I rubbed into the wood in a circular motion with an old undershirt. I recovered the seat in some scrap fabric that I had leftover from a previous project.


Every time I do another project with Annie Sloan's products I learn something new. What I learned this time is that working on a piece with round legs can be tricky. Because the legs weren't a flat surface I had to go slowly to make sure that the worn look didn't look too uniform and that it didn't get too heavy in places and not heavy enough in other places. I also learned that to get this look it worked better to apply the dark wax in a side-to-side motion and then rub the wax into the paint in a circular motion instead of in the same direction in which I had applied the wax. If I did that, then I ended up essentially wiping off the wax and erasing the effect I was going for. By waxing in one direction and rubbing in a different direction, I got the old patina look that I wanted.
Did anyone else think of Karate Kid with all that talk about wax on, wax off? No, just me?
Tell me what you think of my little bench project and leave any tips you've learned with Annie Sloan products.
Happy Waxing, Cheap Mamas! (Not brow or bikini waxing. That's another post for another time.)
Friday, October 21, 2011
Fall Scents For Less
One of my favorite things about fall is all of the wonderful scented candles that come with the season. I love all of the warm and cozy scents like gingerbread, pumpkin, vanilla and others but I don't like paying a lot to enjoy those scents.
In my pre-Cheap Mama days I used to plop down a lot of money for candles and scented oils to make my home smell great but when you're on a budget those expensive candles just aren't on the priority list.
This is why I was pleasantly surprised to find that the line of Better Homes & Gardens fall candles at Wal-Mart not only has a line of great scents but the quality is also there as well. These candles and accessories fill my house with warm fall scents just as good as the expensive ones did.
The candles are priced just under $5 and there are also bricks of scented wax cubes that can be used in a tea-candle diffuser priced at $2 each.


All of these can be found in the seasonal aisles at Wal-Mart so they probably won't be around forever. So if fall candles are in your budget, get them while the gettin's good as they say!
Here's to enjoying the scents of fall, Cheap Mamas!
In my pre-Cheap Mama days I used to plop down a lot of money for candles and scented oils to make my home smell great but when you're on a budget those expensive candles just aren't on the priority list.
This is why I was pleasantly surprised to find that the line of Better Homes & Gardens fall candles at Wal-Mart not only has a line of great scents but the quality is also there as well. These candles and accessories fill my house with warm fall scents just as good as the expensive ones did.
The candles are priced just under $5 and there are also bricks of scented wax cubes that can be used in a tea-candle diffuser priced at $2 each.
$2 gets you 6 cubes that you break off and use one at a time. The great part is that they aren't a one-time use. I have used the missing cube for several uses. The wax will re-melt with each use and I keep using it until I think that the scent is waning.

Below is a candle and a cube in a diffuser which I purchased eons ago from Bath & Body Works. I added some small pumpkins and pine cones from my yard for a fall arrangement.

All of these can be found in the seasonal aisles at Wal-Mart so they probably won't be around forever. So if fall candles are in your budget, get them while the gettin's good as they say!
Here's to enjoying the scents of fall, Cheap Mamas!
Wednesday, October 19, 2011
Antique Tool Caddy Turned Desk Accessory
This week Donna of Funky Junk Interiors presented her readers with a challenge. The challenge was to choose an object in our home and to think outside the box. To find a different way to use that item instead of the original purpose for which it was intended.
When she issued this challenge I had just finished claiming our back-door-desk-junk-holder into my own official desk and was having fun adding items to make the space mine all mine.
I also had an antique tool caddy that I had snatched up at the Habitat store which I had intended to use for floral arrangements.

Isn't it so cute? When I bought it I had imagined all sorts of floral arrangements for each season. However, every time I tried to find a place for it in my kitchen or living room I could never find the right spot. It was either too small or too big for every space I tried. Thus, it was left sad and lonely in the laundry room while I tried to find another use for it.
Enter the Funky Junk challenge.
As I carried the tool caddy around my house I had an epiphany. (Or I may have had the epiphany while I was lying in bed at night thinking about my house projects instead of sleeping, which I tend to often do.) What if I used it for my desk to store pens, sticky note pads, and other Cheap Mama desk items?

And a desk organizer was born! I love it here. (I'm actually sitting at the desk right now typing this post). It brings my style in a small way to my desk and actually serves a useful purpose instead of merely a decorative one.
If you, like me, are interested in turning trash to treasure, blogging, home decorating and spending time with a great lady please visit Donna at Funky Junk Interiors.
Tuesday, September 20, 2011
Decorating With Odd Numbers
In college I loved to come home from class and watch Christopher Lowell's home decorating TV show. I should have known I needed to change my major when all I wanted to do was watch decorating shows and read home interior magazines instead of wasting away in Organic Chemistry lab. Oh well, I probably wouldn't have made a very good pediatrician anyway what with my internet addiction and homeschooling ways. While watching Christopher's show I learned many tricks from him. Namely that you can make just about anything with guns of the both the staple and hot glue variety, a tip that I use to this very day.
His show was almost like a how to decorate show or Home Decorating for Dummies and I loved it. One of the tricks of the trade that he shared was the power of decorating in odd numbers. Be it a single picture or a grouping of 3, 5, or 9, using odd numbers often works well when creating vignettes for a mantel, side table or table scape.
To show the power of decorating in odd numbers I have pulled some photos from Pinterest to show how it can work in different settings.
However, don't think that even numbers are left out in home decorating! In my next post I'm going to show how symmetry and even numbers can be used as well.
Here are some of the absolutely lovely photos I pulled from Pinterest.


Three pieces of artwork in a child's room.

His show was almost like a how to decorate show or Home Decorating for Dummies and I loved it. One of the tricks of the trade that he shared was the power of decorating in odd numbers. Be it a single picture or a grouping of 3, 5, or 9, using odd numbers often works well when creating vignettes for a mantel, side table or table scape.
To show the power of decorating in odd numbers I have pulled some photos from Pinterest to show how it can work in different settings.
However, don't think that even numbers are left out in home decorating! In my next post I'm going to show how symmetry and even numbers can be used as well.
Here are some of the absolutely lovely photos I pulled from Pinterest.
Three throw pillows on a sofa.
Three candles on a table.
Three pumpkins for fall.
Five stems in a vase.

I love how the 7 candlesticks are broken up into groups of 4 and 3.
Three topiaries on a Christmas mantel.
Three canisters in the kitchen.
A simple but beautiful vignette of three single items.
Three pieces of artwork in a child's room.

And, of course, the power of one beautiful floral arrangement.
I can't wait to share all of the great ideas I found in decorating with even numbers. It'll be great for all of you quasi-OCD people like me!
Happy decorating Cheap Mamas!
Wednesday, September 7, 2011
Williams Sonoma Inspired Pumpkin Wreath for Cheap
I would love to take credit for this idea all on my own. I would love to tell you that I was scouring the web trying to find great fall inspiration to do on a dime. I would love for you to think all of that and more.
But it just wouldn't be true.
This idea was sent to me from my friend Magnolia via a Facebook message. She sent me a picture of this pumpkin wreath that she found on the Williams Sonoma website that she was planning to redo for cheap.


But it just wouldn't be true.
This idea was sent to me from my friend Magnolia via a Facebook message. She sent me a picture of this pumpkin wreath that she found on the Williams Sonoma website that she was planning to redo for cheap.

This wreath was listed for $99.95 which means that would have cost me one whole benjamin plus shipping so I decided that I, too, would try my hand at reinterpreting this pumpkin wreath for cheap.
One of my least favorite things is trying to glue moss to anything so I decided to use a grapevine wreath instead of a moss covered one for my wreath. Using this method meant I only needed 3 items to make this wreath: grapevine wreath, pumpkins and brown ribbon.
The WS wreath is listed at 16 inches. I used a 24 inch grapevine wreath.
The supplies.

I used 10 pumpkins on a stick to make my wreath. I spaced them out evenly around the wreath, poked the sticks through the grapevine and wrapped them around the back until they were snug. There's no perfect way to do this! Just keeping working with it until the pumpkin feels secure.

I tied a strip of ribbon around the wreath itself and then tied my bow to that string.

Finished product.


Here is my friend Magnolia's finished product on her interpretation of the pumpkin wreath. Doesn't it look fabulous?! Magnolia spent just under $30 on her wreath by utilizing sales and coupons.

I purchased all of my products at Hobby Lobby. Here is the cost breakdown for this cheap pumpkin wreath.
Grapevine wreath: $5.99
Pumpkins: $2.99 each
Ribbon: Varies. (Ribbon can be as cheap as you want or as fancy as you want. I already had some brown ribbon so I honestly don't know how much the few inches I used would have cost.)
Most expensive this wreath could be: $36 plus ribbon
Cheapest price this wreath could be: $18 plus ribbon
That's a savings of $82 at most and $64 at the very least! I could buy a lot of hoodie sweatshirts for that much money. A lot.
Happy wreathing Cheap Mamas!
Monday, August 29, 2011
Antique Distressed Dresser using Chalk Paint
If I know one thing about marriage, it's about compromise.
When we moved into the house we live in now it was the first house that my husband and I owned together. In fact, we built the house ourselves creating a space that fit our family perfectly. However with more space came lots of...space. We didn't quite have enough furniture to fill our new home. Fortunately my gracious in-laws decided to send us a truck of furniture culled from both of my husband's grandmothers' previous homes.
Some pieces were lovely, some pieces were not so lovely and others just needed a little TLC.
Once we got all of the pieces arranged around the house we were left with a dresser that was a bit of an odd man out. It just didn't work in any of the rooms but Georgia Boy refused to get rid of it because of its sentimental value.
As an anti-hoarder I am usually inclined to immediately part with something if it doesn't work or we don't need it. I don't like keeping things around "just because." But Georgia Boy wasn't going to budge on this one.
One evening while contemplating the ugly dresser dilemma it finally dawned on me that I might be able to make the dresser work as a kind of sideboard in our sitting room. I asked Georgia boy if I could paint it and he agreed!
In most of the living areas of my house I tend to favor warmer colors but my bedroom is very cool and calm. I decided this would be the perfect place and piece to try to create the pale blue French antique look instead of my traditional warmer/off-white tones. I also decided this would be the perfect piece on which to try Annie Sloan Chalk Paint.
Here is the dresser before. Great lines, no real problems but it was the traditional 1960's brown with black flecked finish.


I first painted the whole piece in Annie Sloan Chalk Paint Old White.

I then lightly glazed it with a mixture of 3 parts clear glaze and 1 part Sherwin Williams Silvermist latex paint and then distressed it with a rough grit sandpaper along the edges.

Next I applied one coat of Annie Sloan clear wax with a stiff brush. I then applied a coat of Annie Sloan dark wax. I was tempted to skip the step using the clear wax but I had heard stories of people who went straight to the dark wax and ended up regretting it because it turned their piece way too dark instead of giving it the lightly distressed and antique look that I wanted.
The trick for this piece was to use the clear wax first and then use a very light hand to apply the dark wax. I barely tapped the end of my bristles into the dark wax and very lightly, with an almost dry brush technique, applied the wax. I then rubbed the dark wax into the piece with the brush that I had used with the clear wax to soften the appearance of the dark wax.


I left the hardware in its original state. I really felt like I couldn't improve on the color and the contrast with the painted wood kept it from feeling too girly. I am really pleased with the result and the good part is that Georgia Boy gave his approval too!
No rest for the weary, though, because I've got more pieces waiting in the wings!
Happy painting Cheap Mamas!
Saturday, August 27, 2011
$1 Painted Wall Sconces
Does anyone else out there have that one item that when you see it on sale (or not!) you just can't seem to pass it up? For my mother, it's lamps. For me, it's candlesticks. I don't know if it's the straight lines or the promised candlelit ambience that they represent but I love candlesticks, candelabras and wall sconces.
You can imagine how excited I was when I found these wall sconces for $1 a piece! Never mind that they were made of some sort of resin and had that awful brown/black-flecked look, I couldn't pass them up. Visions of painted sconces were already dancing in my head.

I painted them with Annie Sloan Chalk Paint in Old White. Mostly because this meant that I wouldn't have to prime them and also I was painting a dresser at the same time in the same color so it was just too easy to slap some paint on these sconces while I had all of the supplies available.
After the coat of Old White I lightly hit the edges with some gold leaf paint I had on hand, distressed them with sandpaper and then hit them with a light touch of Annie Sloan dark wax.
Basically it was a complete experiment for me but I figured there was no way I could go wrong on trying different things on my $1 sconces!


I'd say that is quite an improvement, wouldn't you? And all for $2! That makes this Cheap Mama a very happy Cheap Mama indeed.
You can imagine how excited I was when I found these wall sconces for $1 a piece! Never mind that they were made of some sort of resin and had that awful brown/black-flecked look, I couldn't pass them up. Visions of painted sconces were already dancing in my head.
The sad brown and gray wall sconces.

I painted them with Annie Sloan Chalk Paint in Old White. Mostly because this meant that I wouldn't have to prime them and also I was painting a dresser at the same time in the same color so it was just too easy to slap some paint on these sconces while I had all of the supplies available.
After the coat of Old White I lightly hit the edges with some gold leaf paint I had on hand, distressed them with sandpaper and then hit them with a light touch of Annie Sloan dark wax.
Basically it was a complete experiment for me but I figured there was no way I could go wrong on trying different things on my $1 sconces!


I'd say that is quite an improvement, wouldn't you? And all for $2! That makes this Cheap Mama a very happy Cheap Mama indeed.
Friday, August 26, 2011
Basket Lady
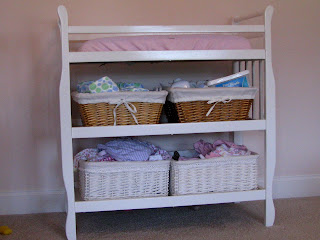
There are cat ladies, bird ladies, bag ladies and then there's me, the basket lady. I love utilizing baskets in any room and for any purpose. I love the organization that baskets provide while at the same time being beautiful enough to leave in plain view. To me, bins say "put me in the closet" but baskets say "leave me out to be admired."
When I started photographing all of the baskets in my house I don't think I realized just how much I love baskets! These are only about half of the baskets that I have throughout my house.
I used to shop for baskets at my favorite discount stores or when Hobby Lobby had them on sale but recently I discovered just how cheaply baskets can be found at consignment stores.
The Habitat Restore, Goodwill, garage sales and other consignment places are wonderful places to find cheap baskets for organization. Some of the baskets below cost me as little as $1 or $2, some even less!
I love baskets for holding...


Now I'm off to spend some much needed time with Georgia Boy watching a movie. Did I mention the movie stars Matthew McConaughey? Not a bad way to spend a Friday night.
Happy weekend, Cheap Mamas.
When I started photographing all of the baskets in my house I don't think I realized just how much I love baskets! These are only about half of the baskets that I have throughout my house.
I used to shop for baskets at my favorite discount stores or when Hobby Lobby had them on sale but recently I discovered just how cheaply baskets can be found at consignment stores.
The Habitat Restore, Goodwill, garage sales and other consignment places are wonderful places to find cheap baskets for organization. Some of the baskets below cost me as little as $1 or $2, some even less!
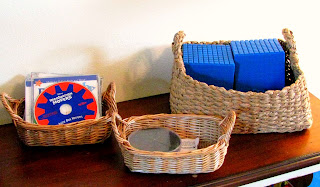
I love baskets for holding...
Magazines

Toilet tissue

Bathroom toiletries

Books for the baby

Changing table items

Homeschool Supplies

Remote controls

Games, DVDs, Wii games and controllers and toys, oh my!

For books, magazines or snacks on the playroom ottoman

More books! I love wire baskets too!

Throw blankets in the living room

Books in the living room

Dog toys

and shoes by the back door.

Now I'm off to spend some much needed time with Georgia Boy watching a movie. Did I mention the movie stars Matthew McConaughey? Not a bad way to spend a Friday night.
Happy weekend, Cheap Mamas.
Subscribe to:
Posts (Atom)